How to Fit a TRV – Thermostatic Radiator Valve
A thermostatic radiator valve (TRV) gives you greater control and automation over the temperature in each room of your home. Even better, installing a TRV can significantly reduce your monthly energy bills by preventing unnecessary heat loss. While the installation process is fairly quick and simple, it’s important to follow the correct steps to avoid leaks or system damage.
In this easy step-by-step guide, you’ll learn how to fit a TRV to your radiator, what tools you’ll need, and how to test it for proper function.
What is a Thermostatic Radiator Valve?
A thermostatic radiator valve (TRV) is a temperature control device installed on your radiator’s pipework. It works by automatically adjusting the amount of hot water entering the radiator, helping you control the temperature in each room independently.
Unlike manual radiator valves, which require you to turn them on or off by hand, TRVs regulate heat output based on the room’s ambient temperature – offering better comfort and improved energy efficiency.
There are two main types of TRVs:
- Liquid/Spring-based TRVs – These use a spring-loaded element filled with liquid that expands or contracts with temperature changes.
- Wax-based TRVs – These contain a wax capsule that reacts to heat in the same way, controlling the valve’s movement.
Both types perform the same function: adjusting radiator output based on temperature, but liquid-filled TRVs tend to react more quickly than wax-based ones.
Manual Radiator Valve vs Thermostatic Radiator Valve
A manual radiator valve is a simple device that you turn by hand to open or close the flow of hot water from the boiler into the radiator, much like turning a tap on or off. It doesn’t respond to room temperature; it simply allows more or less hot water to pass through based on your manual setting.
In contrast, a thermostatic radiator valve (TRV) automatically controls the amount of hot water entering the radiator by sensing the ambient temperature in the room. As the room warms up, the TRV gradually closes to reduce heat output; when the room cools, it opens again to allow more heat through.
While the installation process for both types of radiator valves is very similar, TRVs offer automated temperature control and improved energy efficiency, making them ideal for zoned heating.
Where Should You Install a TRV
Most modern thermostatic radiator valves (TRVs) are bidirectional, meaning they can be installed on either the flow pipe (hot water coming into the radiator) or the return pipe (water exiting the radiator). However, to ensure optimal performance and to prevent noise issues, it’s strongly recommended to install the TRV on the flow side – the pipe that brings hot water into the radiator.
Why Not the Return Pipe?
If you mistakenly install a non-bidirectional TRV on the return pipe, you may experience vibrating sounds, whistling or knocking noises or reduced heating efficiency. These issues occur because the internal mechanism isn’t designed to handle reverse pressure or turbulent flow in the same way on the return side.
If you have a heating setup with multiple rooms, it’s important to avoid installing a TRV on the radiator that contains the room’s main thermostat. Here’s why:
- The room thermostat controls the entire heating system based on the temperature it senses.
- If a TRV is also regulating that radiator, the thermostat may get a false reading and shut off the boiler prematurely.
- This reduces comfort and wastes energy instead of saving it.
In this case, the radiator connected to the room thermostat should:
- Have no TRV fitted
- Use a fully open lockshield valve to ensure maximum flow and accurate temperature readings
Pro Tip: Always consult a qualified heating engineer if you’re unsure. They can assess your system layout and recommend the best TRV placement for energy efficiency and comfort.
How to Fit a Thermostatic Radiator Valve (TRV)
Fitting or replacing a TRV is a manageable DIY task if you’re confident with basic plumbing. Here’s how to start the process – by safely draining your heating system and preparing the radiator.
Tools You’ll Need:
- Radiator bleed key
- Drain-off hose
- Adjustable spanner
- Bucket or old towels
1. Drain the System and Bleed the Radiators
Drain down your heating system and allow air into all the radiators, where you plan to install TRV’s. Bleed your radiators with a bleed key and a hose. Once the water stops running, you are ready to remove the old valve.
2. Remove the Old Radiator Valve
Pull the top cover off to reveal the simple on/off valve. Using grips and an adjustable spanner, slacken off the nut that is coming out of the radiator pipework. Once it’s loose, you can slip the pipework out to see if all the water has drained out of the system. Next, loosen off the 15mm pressure fitting on the bottom of the valve. You can then remove the whole valve from the radiator pipe.
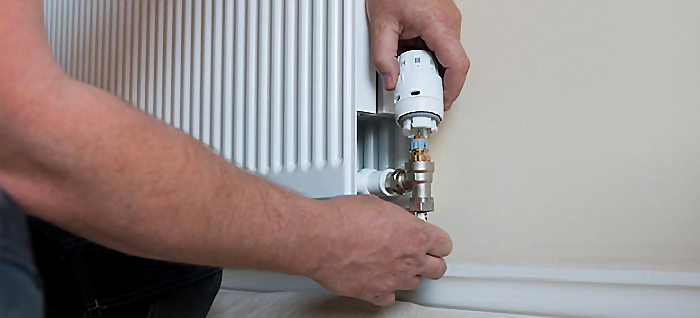
3. Fitting the New Thermostatic Radiator Valve
Sometimes the new TRV won’t fit on the current valve insert. They supply all new TRVs with a new insert, so you may have to remove the old one. Insert a simple hex tool into the hole and then use an adjustable spanner to loosen the part. Now wrap a PTFE around the new insert, push it into the radiator and tighten it up. The old nut and olive should be fine to use, but if you want to change those, just pull the nut off and use a pair of grips to pull the olive.
Wrap a bit of PTFE around the new olive to ensure a watertight seal. Push the fitting back in and tighten up the bottom joint. Make sure everything is tight and remove the top plastic cap of the valve. You can test if it springs up and down the right way. Put the TRV head unit on the top and adjust it. You should now have a working TRV.
Can You Put Thermostatic Valves on Old Radiators?
Yes, you can install thermostatic radiator valves (TRVs) on old radiators. Most older radiators use standard pipe sizes (typically 15mm in the UK), which are compatible with modern TRVs. However, you may need to do some minor adjustments or use additional fittings depending on the age and condition of your system.
What to Check Before Installing a TRV on an Old Radiator:
- Pipe compatibility
Most modern TRVs fit 15mm copper or plastic pipes. If your radiator uses 10mm microbore or larger pipes, you may need adapters. - Threaded valve inserts
Older radiators might have worn or seized valve threads. In that case, you may need to remove and replace the radiator tail with the one provided in your TRV kit. - System condition
If your system hasn’t been serviced in years, consider a power flush to remove internal sludge before fitting TRVs. - Drain down required
As with all TRV installations, you’ll need to drain the radiator before swapping the valve.
TRVs can usually be fitted to old radiators, but if the system is outdated or corroded, it’s best to get advice from a heating engineer.
Pro Tip: If you’re unsure, take a photo of your radiator pipework and bring it to a plumbing merchant — they can tell you if a TRV will fit or if you need an adapter.
Can you Change a Radiator Valve Without Draining the System?
Yes, it’s possible to change a radiator valve without fully draining the central heating system, but this method is best suited for experienced DIYers or professionals, as it carries some risks if not done properly. We only recommend this method if you’re confident with plumbing skills. If you’re unsure, it’s best to hire a professional heating engineer to avoid leaks or water damage.
Step-by-Step Instructions:
1. Turn off the heating system and let it cool – Switch off the power to the boiler at the circuit breaker and turn off the water supply to prevent leaks or water damage. Ensure you follow all safety protocols and refer to the manufacturer’s guidelines for additional instructions.
2. Close both valves on the radiator – Turn the lockshield valve (on one side) fully clockwise, then close the thermostatic or manual valve on the other side.
3. Bleed the radiator to release pressure – Use a radiator bleed key to open the bleed valve at the top of the radiator. Let any built-up air escape, then close the bleed valve again.
4. Loosen the valve union – Hold the valve body steady with a wrench. Use a spanner to loosen the top nut connecting the valve to the radiator. As water and air start to escape, position towels and a container underneath to catch the draining water. This process will last a few minutes until the radiator is mostly empty.
6. Remove the old valve completely – Once water stops flowing, disconnect the valve fully and lift it away from the pipe and radiator.
7. Fit the new TRV – Align the new thermostatic radiator valve with the water pipe and the radiator tail. Make sure everything lines up cleanly to avoid cross-threading or leaks.
Tighten all nuts and fittings securely, ensuring the TRV is upright and correctly positioned.
Hold the valve body steady with a wrench. Using an adjustable spanner, tighten both the top and bottom nuts (radiator and pipe connections). Avoid overtightening, as this could damage the threads. Bleed the radiator again to remove any trapped air after refilling.
That’s it! Turn the heating back on and test the new TRV by adjusting the temperature setting to ensure it opens and closes correctly.
Important: Always double-check for leaks around the new valve. If you’re unsure at any stage, don’t hesitate to call a professional plumber.
Takeaways
Whether changing or fitting a thermostatic radiator valve, the process may become difficult, especially to someone with no prior knowledge. We strongly recommend that work of this nature only be attempted by a qualified Gas Safe/Corgi registered plumber. Performing this type of task as DIY can lead to other issues such as leaks, airlocks and central heating failure, so don’t hesitate to ask for help from a radiator installation expert.
How to Fit a TRV – Thermostatic Radiator Valve
Need help? Hire the London Property Service experts today by giving us a call on 020 3078 5920.