How to Remove a Radiator Without Draining the Whole System Down
Changing a radiator might sound like a job best left to a certified plumber – especially when it involves tampering with your home’s central heating system. But don’t worry, with a few basic tools, a bit of preparation, and the right method, you can do it safely without touching the rest of your heating system.
In this step-by-step guide, we’ll show you exactly how to remove a radiator without draining the system, including safety tips, troubleshooting advice, and what to watch out for.
Tools & materials you’ll need
Before you begin, gather these essentials:
- Radiator bleed key;
- Adjustable spanner or wrench;
- A pair of adjustable grips;
- Old towels or cloths;
- A washing-up bowl or shallow bucket
What type of heating system do you have?
If you’re unsure about the exact type, you can look for a little dial on the front of your boiler, which should be located somewhere in your loft or in your airing cupboard. Make a mental note of where that dial is pointing because once you finish this job and you put your old radiator back on the wall, you’re going to need to depressurize the system, and also you might need to add a small amount of inhibitor. If you’ve got a tank in the loft, you don’t need to worry about remembering where the system pressure is.
How to remove a radiator without draining the system
Once you’ve gathered your tools and confirmed your heating system type, you’re ready to begin. Follow these simple steps to remove your radiator safely:
1. Close the radiator valves
Start by shutting off the lockshield and Thermostatic Radiator Valve (TRV), which are positioned at opposite ends of the radiator, to isolate it from the rest of the heating system.
- Lockshield Valve – it is typically installed on the return pipe, which carries water away from the radiator and back to the boiler. Use your adjustable spanner to turn it clockwise until it’s fully closed.
- Thermostatic Radiator Valve – found on the opposite side, this valve controls the temperature. Again, turn it clockwise to close it completely.
Once both valves are shut, use the radiator bleed key to loosen the bleed valve at the top of the radiator. This will release any trapped air, allowing the water to settle in the radiator without pressure.
You may notice a small amount of water escaping as the pressure equalises in the system. Don’t worry, this is normal and should stop quickly.
2. Drain the radiator
Use the adjustable spanner to grip the valve nut and loosen it carefully. As soon as you begin to unscrew the nut, you’ll notice some water starting to escape from the radiator. This is perfectly normal as the water drains from the system.
Keep a bow close by to catch the water. As the water drains, you’ll likely need to tighten the nut back up once the bow fills up. When that happens, simply turn the nut back to the closed position, then pour the collected water into a larger bucket. Repeat this process until all the water has drained out.
Pro Tip: Even if you encounter a small leak, keep towels or clothes underneath the radiator. They’ll soak up any stray drips, preventing a mess and protecting your flooring.
3. Pull the valve off
If your radiator pipework has enough flexibility, you can pull the valve off carefully to speed up the drainage process. This allows the water to flow out much quicker, reducing the time you need to spend waiting for it to fully drain.
Just be sure to hold the valve steady while you remove it to avoid any sudden spills. Once the water stops flowing, you can move on to the next step.
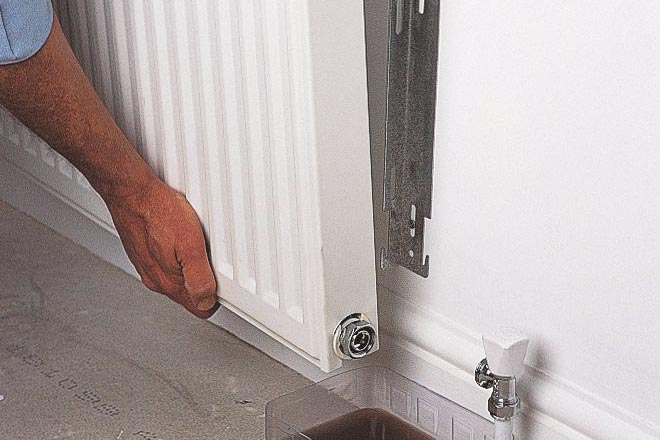
4. Remove the radiator from its brackets
Now that the water has drained from the heating system, it’s time to remove the radiator from the wall:
- Examine the brackets carefully: There are various types of radiator brackets, so take a good look at how yours are secured before attempting to remove the radiator.
- Loosen the second valve: Just as you did with the first pipe, slacken off the nut on the opposite side of the radiator. Unscrew it completely, but be mindful that a small amount of water may still come out — this is normal. Use your towels to mop it up quickly.
5. Tilt the radiator to drain the remaining water
To ensure all the water is fully drained from the radiator, tilt it slightly toward the side with the TRV (thermostatic radiator valve). This will help any trapped water at the bottom of the radiator flow out into the bow. Hold the radiator at an angle for 5–10 minutes to allow as much water to drain as possible.
Once the water has drained completely, carefully pop the radiator off its clips and set it aside.
6. Block the valve ends
If you’re not draining the entire system and just need to temporarily stop the water from flowing out, you can cap or block the valve ends.
- Use radiator valve caps for a secure, proper seal.
- If you don’t have caps on hand, you can improvise by using plastic bags and securing them tightly with rubber bands.
This will prevent any water from leaking out while you work, ensuring your space stays dry.
7. Refit the radiator
Putting the radiator back is just reversing the entire process and putting it all back together. Pop the radiator back onto the clips and put your pipes back on. Then, you can open up the valves, bleed that excess air and refill the radiator. If you have a pressurised system, go back and make sure it’s nicely topped up.
Make sure you know what you are dealing with, before you start with the process, as it may become daunting for someone with no prior knowledge. We recommend calling expert radiator fitters if there’s any uncertainty.
What if the radiator doesn’t heat up after reinstallation?
If your radiator isn’t heating up properly after reinstalling, follow these troubleshooting steps:
- Ensure the valves are fully open – double-check that both the lockshield valve and the TRV (or manual valve) are completely open.
- Bleed the radiator again – air may have trapped inside, preventing the radiator from heating properly. Use the radiator bleed key to release any remaining air.
- Check the boiler pressure – if the pressure is too low (below 1 bar), the system might not be circulating water properly. Repressurise the system using the filling loop if necessary.
- Balance your system – if the radiator still doesn’t heat up evenly, the system may need balancing. This ensures each radiator gets the correct flow of hot water.
By following these steps, you should be able to get your radiator working properly again.
When you should drain the system instead
In some cases, you’ll need to drain the entire system. Consider doing a full drain if:
- You’re replacing multiple radiators – when replacing more than one radiator, it’s often easier and safer to drain the system entirely.
- You’re altering the pipework: if you’re making changes to the plumbing or relocating radiators, a full drain ensures no mess or damage.
- You have faulty or seized valves: if the valves are old, stuck, or not functioning properly, it’s best to drain the system before attempting to replace them.
- Your heating system needs a flush: if it’s time for a system flush to remove sludge or debris, draining the system will help with this process.
In these situations, draining the system fully is the safest and most effective way to proceed.
How to Remove a Radiator Without Draining the Whole System Down
Need help? Hire the London Property Service experts today by giving us a call on 020 3078 5920.