Bathroom Refurbishment Project in Wimbledon
Complete bathroom refurbishment is one of the large-scale renovations every homeowner would have to deal at some point. A good example of such a project by the professional technicians from My Plumber is a bathroom refurbishment in Wimbledon we did for a client. Completely changing the layout of an entire bathroom is no small feat. It usually takes several days and lots of effort. You could try doing it on your own, or you could call a professional fitter.
But in both cases, you as a homeowner should have a simple idea of the desired result.
If you’re considering taking on such a renovation project, keep reading. In this article, the professional technicians from My Plumber explain how a complete bathroom refurbishment project goes on a day-by-day basis.
This article is for all of you who:
- Own an old shower room in need of a full makeover;
- Noticed the shower room needs small, or big repairs;
- Enjoy some DIY work around the house.
Table of Contents
Day 1 – Organize and remove old furniture
Many people don’t know what to expect from bathroom refurbishment. It involves a lot of physical labour, and your bathroom will look like a war zone for a painful while. You wouldn’t want to have guests over, while the process is going. But, don’t worry, because, with a wonderful organization, you can get through this hectic project, no problem.
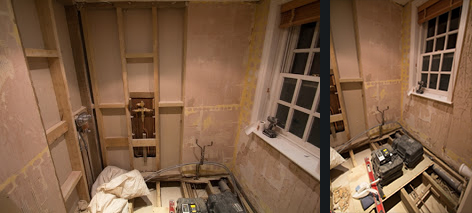
First, here are two shots of the bathroom before the renovation:

Know what you want
Organizing your project beforehand will save you a lot of time. It’s a lot easier for the fitter to work when they know your exact wishes. This is your opportunity to create a bathroom that will see you through the next 10 years. So think long and hard.
The Internet is your best friend in this first organizational step. Save pictures of the bathroom interiors that catch your eye the most. Create a mood board on your computer and stick pictures of your most favorite interior pieces. The copy/paste method. You need not be a designer to do this. Find your inspiration online on websites like Ideal Home, Houzz, and Pinterest. Here is an example of a mood board.
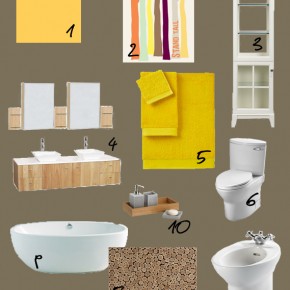
Soon, you’ll know the style that’s most to your liking. It could be traditional, or modern. You could choose your favorite colour combinations. It also makes it easy to pick your favorite design pieces you wish to include in your new bathroom. It won’t be hard to find the right price for them. This way you’ll get a better grasp on the needed budget.
Strip the bathroom
Once you know what you’re aiming at, it’s time to take the entire furniture out of your bathroom, so you would have a clean slate to work on. The bathroom examples below don’t just show you the first step of the bathroom refurbishment process, but also an identified pipe issue that has caused the owners a lot of headaches. Naturally, the hired fitter would tackle this issue while working.
Address plumbing issues

Water damage is no minor matter. There used to be a silicone fix, however, it was close to failing, and it would not have been long before the leak started running again. So, the fitter made the repair on the first day. Note that leaks don’t always show in the area directly below. They go to the lowest point in the room, which can make it difficult to identify exactly what the problem is.
These kinds of problems often occur because of improper installation of the fixtures. My Plumber guarantees a job well done with their fantastic bathroom installations.
Day 2 – Materials and suppliers
After they removed the bathroom furniture, the rotten wood because of the leak became apparent. It was unsightly, but that’s why there’s a renovation coming up. The leak resulted from poor workmanship by the previous bathroom fitters. A lot of bathroom fitters cut corners by using normal MDF in the shower area. This is a big mistake, because if the water seeps through the tiles, the MDF rots, causing this type of repair issue.
The bathroom fitters at My Plumber always use high-quality materials, including waterproof backing boards, onto which the tiles are fixed. This makes the bathroom even more watertight after the renovation.
After all, the wall tiles are off and they have stripped everything out, it’s time to get the right supplies. Be aware that if there are any delays with the supplies and materials, it would cause extra costs for the fitter.
How did the shower room refit affect the client? They had an additional bathroom in the property, so they had to use that one, while the renovation was going on. There would always be some level of discomfort, considering there are dust sheets everywhere and so many things are moved around. It took the household more time to get prepared for the day. But that’s all in the realm of normality for such a renovation project.
Day 3 – Measuring and light installation
They created the recessed shelves in the showering area on Day 3. The fitter took some careful measuring to work out where the tile cuts will be and to help decide where things will visually look best. They installed all the cables for the lights that day and all light fixtures in the shower area. In addition, the toilet cistern has been fitted, as has the support frame for the toilet.
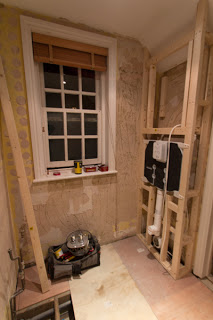
It’s now visible where the toilet will go (the cistern). The client spent a little more money than they had budgeted, to have more lights fitted around the room. Remember that when you change things, they usually cost more. The same goes in case anything unforeseen happens and the bathroom requires additional work.
So, always allow a budget for extras and accept that you might have some great ideas that you want to implement, while you have the chance. It makes the difference between having a “great” shower room and a “super-fantastic” shower room.
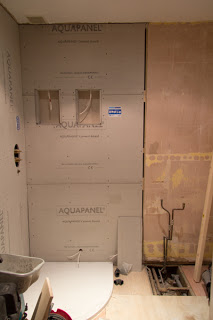
On the picture above is visible where the recessed shelves had to go. There is also a waterproof backboard. They designated the wires near the shower tray to fit more lights. Expect a lot more dust on Day 3. It will be impossible to clean so that job should be left for a later stage of the renovation.
Day 4 – Tiling and arising issues
Today, the fitter finished fitting an Aquaboard around the room (a waterproof board base) and also started tiling. Only half the wall will be tiled, but it’s easy to get an idea of what the finished shower room will look like.
Day 4 presented a few more issues. First, there was a problem with the fan. The ducting was not running in the right direction, which explained why the fan was not properly removing the condensation before. There had to be more ducting installed, which cost the owner an additional £200 to fix, plus the materials.
Second, the Italian wall tiles were supposed to be 300 mm wide, but they turned out to be 297 mm wide. It’s common to encounter an issue like this, and unfortunately, it makes a lot of difference. Since they measured the walls to take tiles that were 300 mm wide, this would result in a small gap between the top of the tiles and the ceiling. The solution is to cut the tiles at the top.
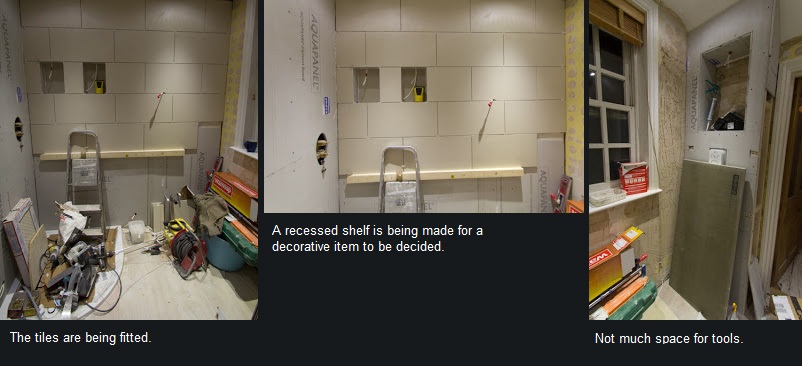
They also fit the lights in the ceiling on Day 4. There are four ceiling lights now, instead of two, which makes a big difference. One of them is located centrally above the shower tray. The hardest parts of the job have now been tackled.
Learn more: My Plumber’s advice on How to choose the right tiles a small bathroom.
Day 5 – Underfloor heating and tiling finalization
The tiling gets finished quickly, despite the tiles being porcelain and the cuts being difficult. Always check the type of tiles with your tiler before you buy them. Ask where the cuts will be so that this is agreed in advance. No one wants any irritations at the end of the job. Choosing porcelain tiles has slowed down the job and a few tiles have cracked in the process.
Remember to buy at least 10% more tiles than you need. You will be thankful for this if you ever crack a tile, as you will want to replace the cracked tile with tiles from the same batch. Day 5 is also the day to get the underfloor heating service done. This way, the room will be almost ready for the floor tiles to be laid.

A new fault was found – it turned out the wiring is mysteriously linked up to the other bathroom. An electrician needed to check the problem before the fitter could continue with the bathroom renovation.
In the meantime, the client got used to the routine of using the other bathroom for their daily routine. It’s normal for one to get irritated by the constant dust everywhere day after day, but watching the developing shower room is making it worth all the hassle and inconvenience for the client. And, let’s not forget, the renovation also fixed some plumbing issues the bathroom had.
Day 6 – New furniture and cleaning
The hardest part was over and all that was left on Day 6, was to install the new bathroom furniture. For the client, this was the most interesting stage of the entire process. They put the new fittings in their place one by one.
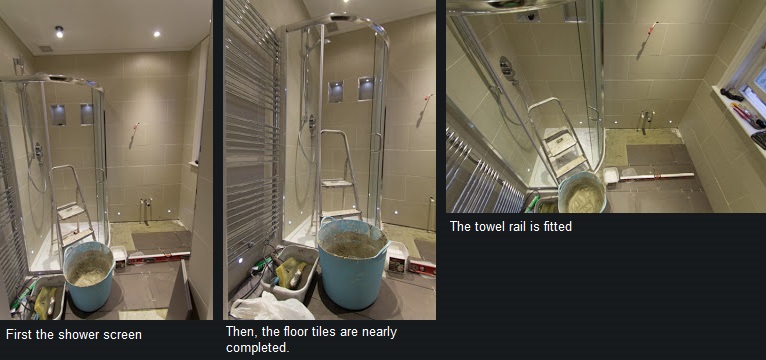
Finally, it was looking kind of like a proper shower room. We’ve encountered a few more issues at this stage. It turned out the supplier had made a couple of mistakes with the order. The basin tap that was supplied was a high-pressure tap rather than a low-pressure tap. So, the client had to choose a different tap. This took a week to arrive. Also, a part of the toilet was missing, which meant another few days of waiting.
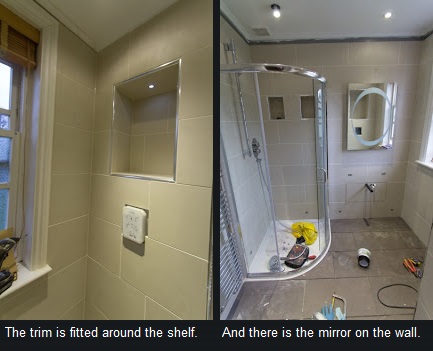
We installed little lights around the bottom of the walls. Also, the mirror lit up. The tiles were completely fitted, and the grouting was done. The client didn’t waste any time cleaning up the dust and debris left from the renovation. The dust sheets were removed, and the bathroom was once again filled with the owner’s personal stuff. With this, the bathroom refurbishment was finished.
There usually is some amount of trash that doesn’t belong to the regular garbage bin. Follow the UK waste regulations when throwing out renovation garbage.
Final result
This is about the average time you would expect for a small shower room. You can really see the difference and I have to say, it is wonderful to walk into a clean shower room with a wonderfully warm floor!
Here are some photos to show you the difference between the old bathroom and the new one.


Useful tips for your bathroom refurbishment project
- Make sure you have a heated mirror – this prevents misting when you are in the shower. This is great for girls as you can get straight on to putting your makeup on. For boys, this means you can get on with your shaving without having to wait for it to clear.
- Before you make a final decision on your tiles, show what you are proposing to your tiler to make sure that he can fit them within the budget he has allowed for tiling. You will pay more for some types of tiles: marble, mosaic, porcelain.
- Always allow 10% as a contingency for unexpected problems.
- Carry out a bathroom plan before the project starts and share this with your fitter. Make sure you include the standard that you are expecting for each item.
- Remember that wall hung bathroom furniture takes more time to fit than floor standing items. So if you are looking for a budget bathroom, stick to standard floor standing items.
- Think about your lighting. Remember that putting a light above the mirror casts an unflattering light on your face. Make sure that you have lights at each side of the mirror.
- Make sure that your plumber covers the carpets properly before starting work. You should also be happy yourself that all your breakables, artwork, ceramics, and anything that you want to keep dust-free is moved as far away as possible. Be very aware that dust will get everywhere, no matter how hard you try.
- If you see photos of bathrooms you like, show your plumber this beforehand so he can see what you like. It might be possible to include some extra bits and bobs which will make a big difference to the look.
Final thoughts
- A full bathroom renovation by My Plumber usually takes between 5 and 10 days, depending on the scale of the project and the client’s wishes;
- It’s common to encounter and fix different plumbing issues the client might have had priorly;
- Other problems could come up, which often delays the project;
- The client should always purchase 10% more tiles than the estimated amount needed, in case any of them break;
Bathroom Refurbishment Project in Wimbledon
Need help? Hire the London Property Service experts today by giving us a call on 020 3078 5920.


